(Last updated on January 14th, 2021)
Wondering how to uninstall, disable, or turn off Avast? You have come to the right place!
If you’ve been an Avast Antivirus user but want to try new antimalware software, obviously you’d be looking to disable Avast before you install the new program. You’d be right, of course. You should never install a new antivirus software until you have removed the previous one.
If you don’t do that, you can run into many problems. The previous software can take some of the coding from the new software as malicious code and prevent its proper installation.
Even after installation, the two software can continue to clash and conflict and present problems impeding optimal protection.
However, with Avast, it isn’t as simple as just uninstalling it. Avast has a special Self-Defense Mode that stops malware apps from removing Avast from your system. The same feature also prevents its complete uninstallation even when you do that.
So, in order to completely remove Avast from your system, you have to follow a few extra steps. Let’s see what methods you can use to uninstall Avast properly.
Related: 5 (Actionable) Tips to Prevent Malware Infections
Uninstall Avast Antivirus from Windows Devices
There are different methods that can help you remove Avast software from your Windows devices. Let’s have a look at them all.
Manual Uninstallation of Avast Antivirus
This method requires you first to disable the Self-Defense mode, and then you can go on to remove the software itself.
Disable the Self-Defense Mode
Step 1: Launch the Avast user interface and click on the Menu tab on the top right corner of the interface.
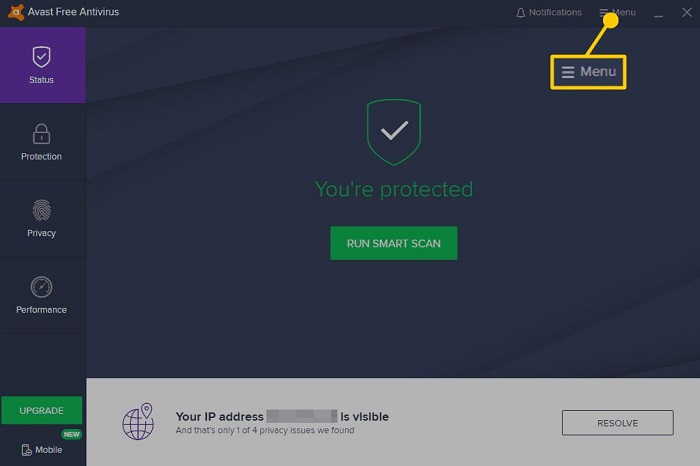
Step 2: A drop-down menu will appear — select Settings on this menu.
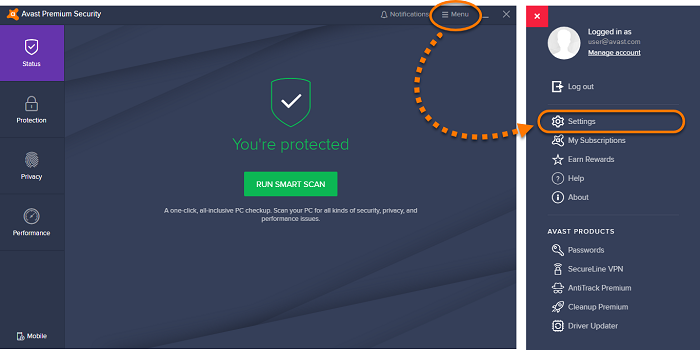
Step 3: The Settings window will open up. Select General from the left-hand side panel, go to Troubleshooting in the sub-menu, and click on it.
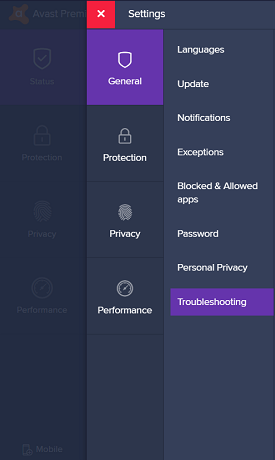
Step 4: Under Troubleshooting options, you’ll find Enable Self-Defense. Uncheck the box next to it to turn it off.

Step 5: Select OK when prompted to confirm the action.
The Self-Defense Mode is now turned off. Close the user interface to proceed with the uninstallation of Avast software.
Uninstall Avast Software
You can follow the same method to uninstall Avast from Windows 10, 8 & 7.
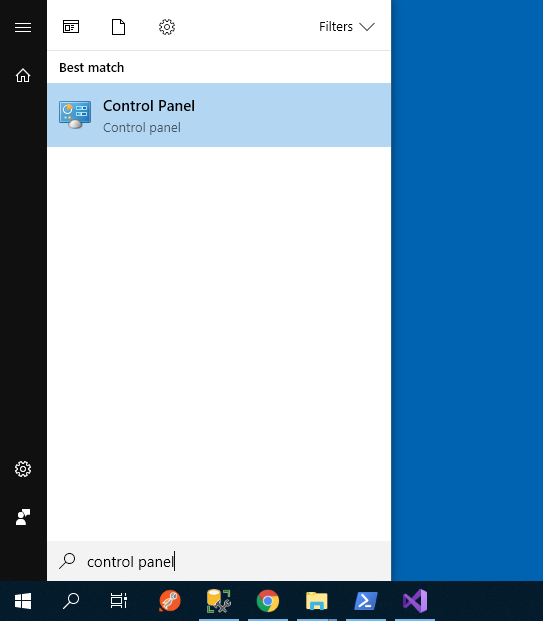
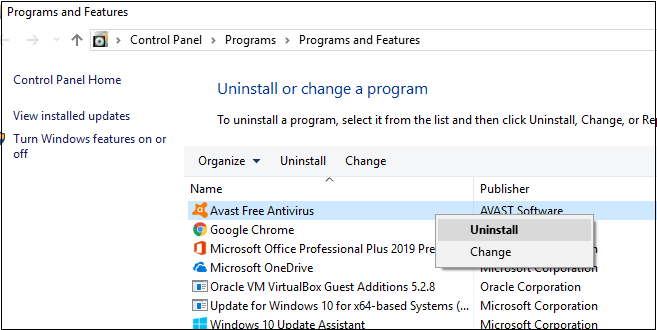
Step 1: Type Control Panel into the Windows Search Box and open the app as it appears.
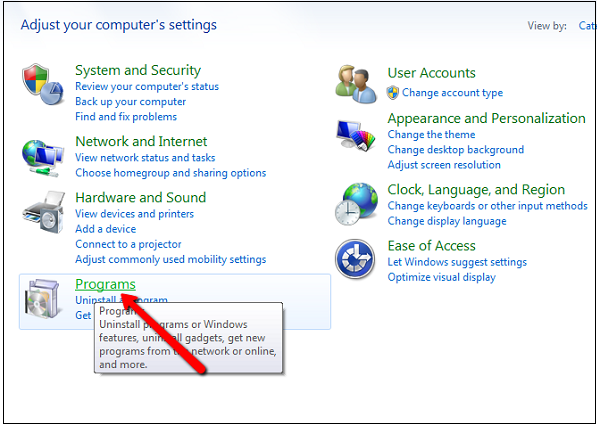
Step 2: In the Control Panel window, go to Programs and Features tab and click on it.
Step 3: The Programs and Features window will open up. Scroll down to Avast Antivirus in the list of programs and click on it. Next select Uninstall from the tabs given above the list of programs.
Step 4: Avast Antivirus setup will open up to display several configurations options. Select Uninstall at the bottom of the screen to start the removal process.
Step 5: A pop-up message will appear to confirm that you want to go ahead with the process. Click on Yes.
The uninstallation process will begin, which might take several minutes to complete.
Step 7: Finally, when the process is complete, the setup will prompt you to Restart computer. You can restart right away or do it later. In either case, the removal process will only be finished after you’ve restarted the Windows.
Uninstall Avast Antivirus using Avast Removal Tool
Here’s another method you can follow to remove Avast Antivirus from your system completely. However, for this method, you’ll need to install the Avast Removal tool.
Uninstall Avast Antivirus
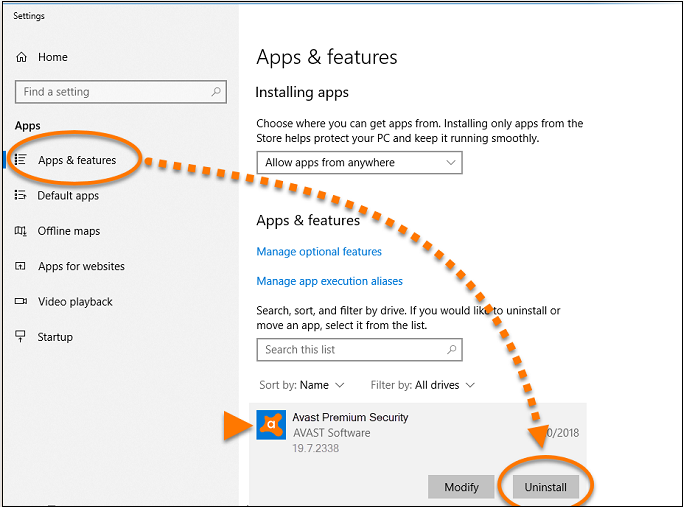
Step 1: For Windows 10, open the Start Menu and click on Settings. Next, click on System.
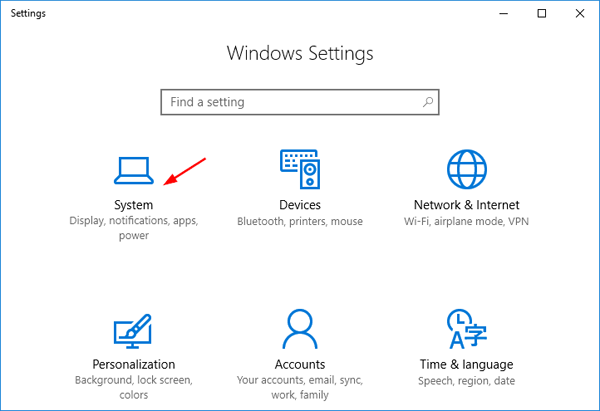
For Windows 7, follow Start Menu > Control Panel > Programs & Features > Avast Antivirus.
Step 2: In the System window, type Apps & features into the search bar and click on it.

Step 3: In the new window, scroll down to Avast Antivirus and click on it.
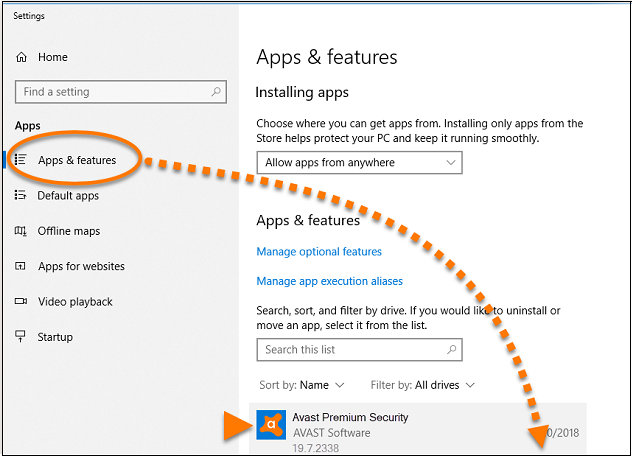
Step 4: The tab will expand to show two options: Modify and Uninstall. Select Uninstall.
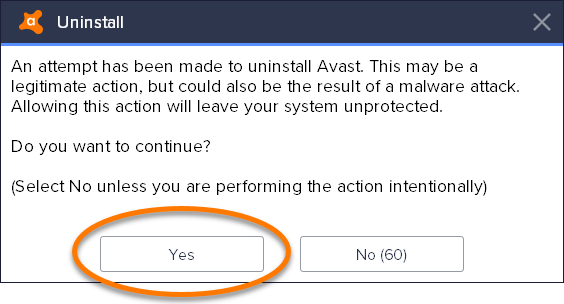
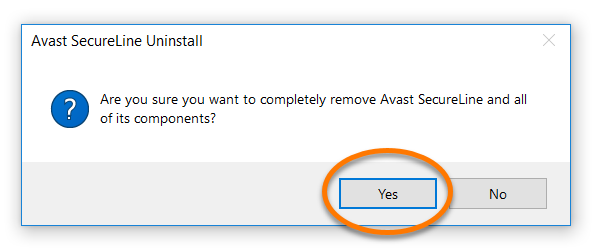
Step 5: The ‘User Account Control’ will show a pop-up message to confirm your action. Select Yes.
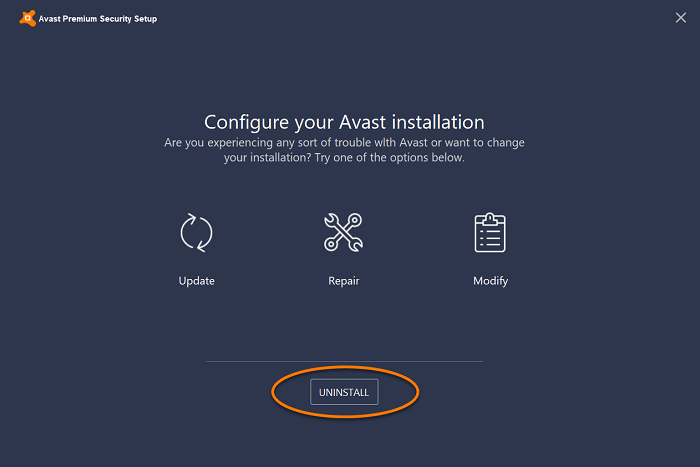
Step 6: This will open up the Avast Antivirus Setup. Click on Uninstall in this window.
Step 7: A pop-up message will ask your final permission to go ahead with the removal process. Click on Yes.
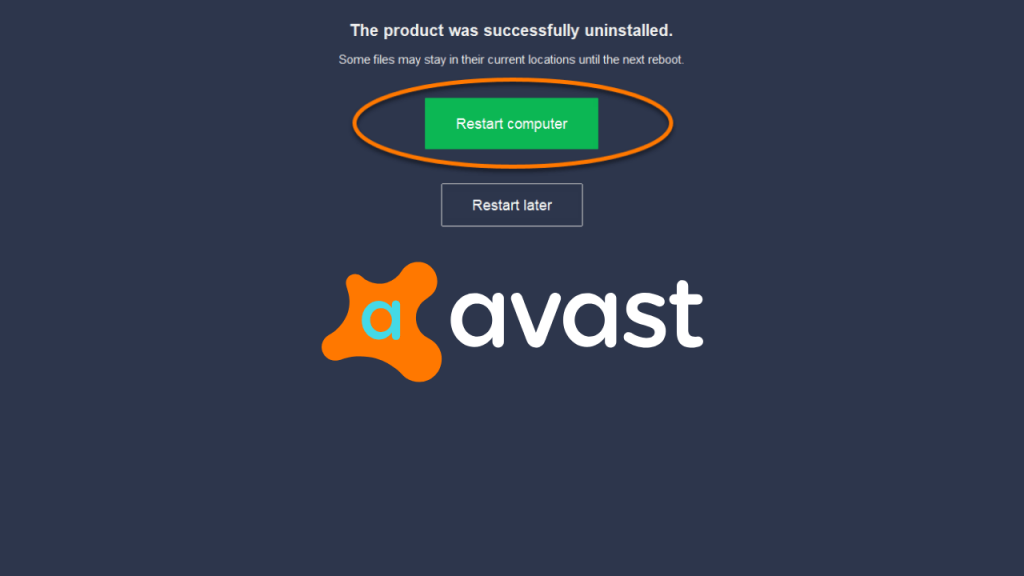
This will start the uninstallation process, which might take a few minutes to complete.
Step 9: A final message will appear, asking you to restart your computer. Select Restart computer.
Use Avast Removal Tool to Remove the Software Completely
Although the above steps have disabled the software and removed much of it from your system. Some files will still be remaining in the system. To remove those as well, follow these steps:
Step 1: Download the Avast Removal Tool from the Avast website.

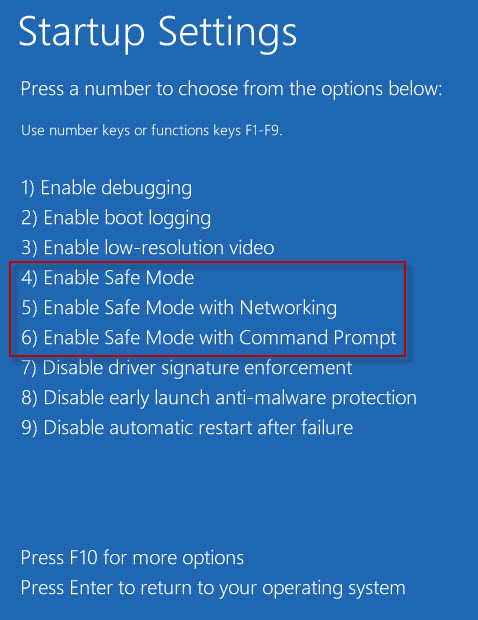
Step 2: Start Windows in Safe Mode.
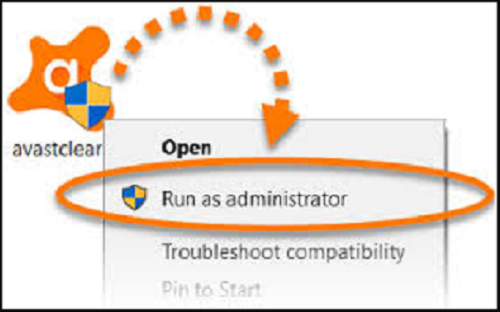
Step 3: Run the Uninstall Utility.
Step 4: If you used a different folder to install Avast other than the default folder. Browser for it and open it.
Step 5: Click REMOVE.
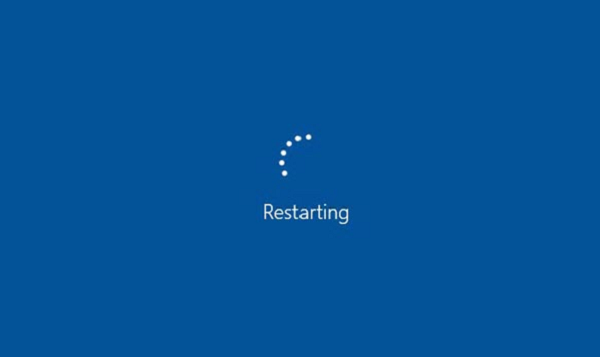
Step 6: Finally, restart your computer once again to apply the new settings.
Uninstall Avast Antivirus from Mac Devices
Just as with Windows, you can use different methods to uninstall Avast Antivirus from your Mac. Below, we discuss each of these methods. You can choose the process you feel most comfortable with.
Manual Uninstallation of Avast Antivirus
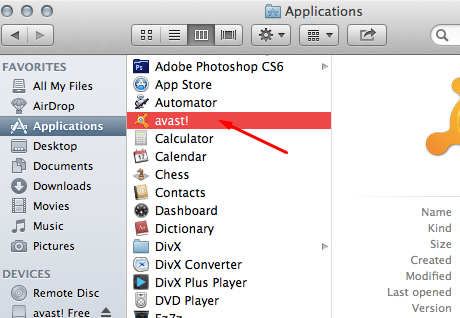
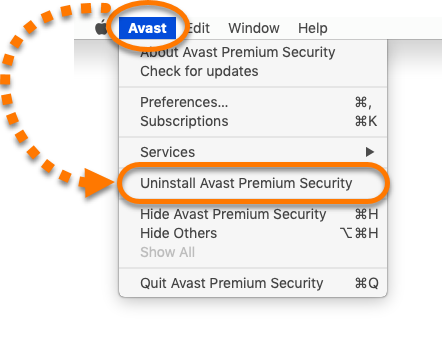
Step 1: Go to your Applications folder and double-click the Avast icon to open the app.
Step 2: In the window that opens, you’ll find Avast on the left side of the top menu bar. Click on it to open the drop-down menu and select Uninstall Avast Premium Security.
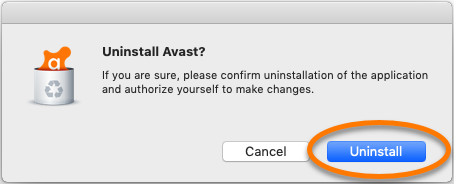
Step 3: In the prompt message, select Uninstall.
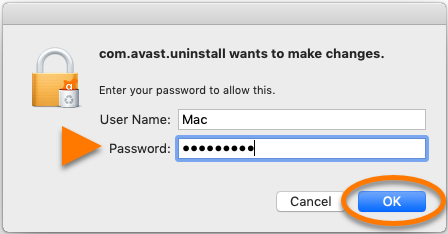
Step 4: Another prompt message will ask for your Admin Password. Provide the password to start the uninstallation.
Step 5: A final prompt message will inform you that the uninstallation is complete. Click on Quit to close the message.

The software will still have some files left on your system. To remove those go to the Library Folder and check the following sub-folders to remove Avast service files:
- Avast under ‘Application Support’
- com.avast.AAFM under ‘Caches’
- com.avast.home.userpront.plist under ‘Launch Agents’
Use Avast Native Uninstaller
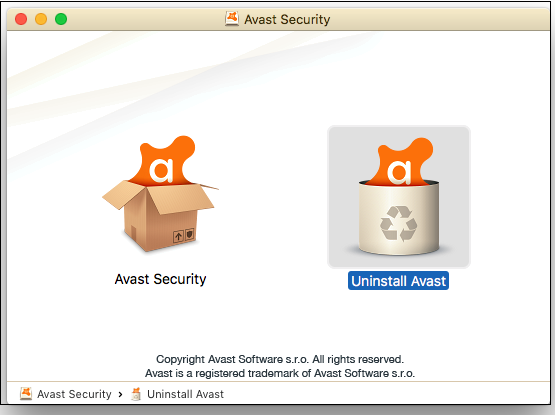
Step 1: Find the Avast install package that you downloaded from the internet and open it. You can find this package in the .dmg files on your system. If you can’t locate those or have lost them, you can download it again from the Avast Official Website.

Step 2: Select Uninstall Avast from the options in the window that opens. The uninstallation process will begin.
Step 3: The Uninstall Wizard will show you a few prompts to get ahead with the process. Follow the instructions till the uninstallation is complete.
Use A Third-Party App Uninstaller to Remove Avast Software
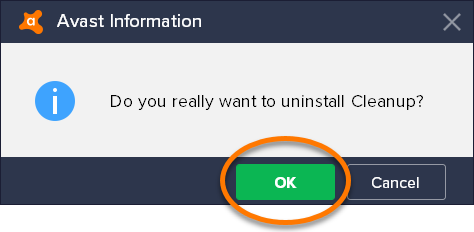
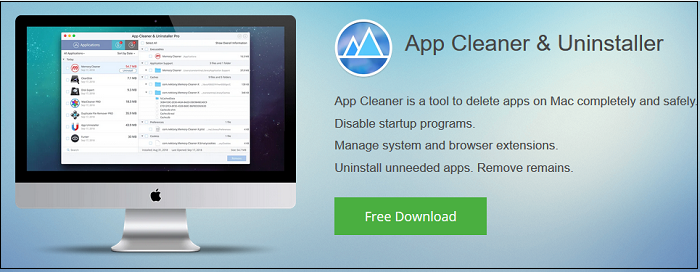
Another useful method to remove Avast from your Mac is to use an app uninstaller, such as App Cleaner & Uninstaller. This utility completely removes the software and its service files from your system without you having to worry about it.
Step 1: Download the App Cleaner & Uninstaller and launch the app.
Step 2: Under Applications, select Avast.

Step 3: Next, click the Remove button on the right-hand corner of the window.
The app cleaner will remove all the software files from your Mac. When the process is complete, it will prompt you about it.
Related: 7 Tips & Tricks to Make Your Computer Run Super Fast
Endnote
You can follow these simple methods to remove Avast from your system. But remember, once your protection is down, you instantly become vulnerable to a plethora of malware or cyber threats.
So, be sure to install another antivirus software as soon as you can to keep yourself and your family safe from all kinds of threats.
Related: 7 Tips & Tricks to Make Your Computer Run Super Fast